HomeAboutGalleryPurchase My ArtWorkshopsFeaturedFree Tutorials

Thursday, December 31, 2009

New Year's Thoughts


"To laugh often and much;
to win the respect of intelligent people
and the affection of children;
to earn the appreciation of honest critics
and endure the betrayal of false friends;
to appreciate beauty;
to find the best in others;
to leave the world a bit better
whether by a healthy child,
a garden patch, or a 
redeemed social condition;
to know even one life
has breathed easier
because you have lived.
This is to have succeeded."

                         RW Emerson


Melange Challenge


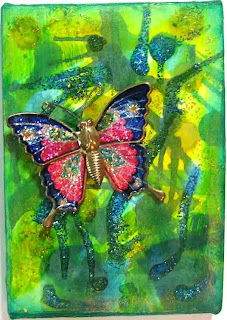
The challenge word this week for the Melange Team is Illuminating. I have chosen this Butterfly ACEO on stretched canvas. It is an abstract pondering the garden view of the butterfly. It may be found in my Etsy shop.

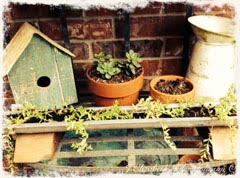
We have been covered with snow for a week at my house. It is unusual for snow to remain more than a couple of days here. So illuminating garden views are a refreshing sight.

Tuesday, December 22, 2009

Merry Christmas to You All!

This is just too cute! Unfortunately it works in reverse at my house. I hope you all have a wonderful holiday season.
I will be back in a week or so.


I received this in an email from my sister. It is originally from this site http://kutyasuli.hu/

Saturday, December 12, 2009

Teaching Children to be Creative, part 3

Sorry about the lapse in these post about teaching children to be creative. The flu has crept into my house and I've been playing nurse.

Freedom is one of the most important gifts you can give your child to encourage creativity. I have already spoken about allowing them to create without being hindered by your expectations. One way you can encourage freedom is by making them an art box. This is something they can get into whenever they choose and do what ever project they want. When my daughter was 5 I fixed a little child-sized table for her by my worktable. She had a box full of supplies to choose whatever she might be inspired by that day. She would work for long periods along side me. And rather than feeling neglected by my work time, she felt we were partners in that time. Her box was filled mostly with supplies I decided I did not need. She had scraps of pretty papers, old buttons, wooden shapes, old greeting cards, tiny papier mache boxes, and more. Then of course, there was the standard pencils, markers, glue sticks, and of course glitter. Yes, you heard me. I said glitter. I know it makes a mess. That's ok. You will live. That's why you have a vacuum sweeper. But we did save paint for more supervised times. But even that changed when she was older.

The last item I want to emphasis is to give your child quality supplies. I don't mean that you should buy professional supplies for children. But you should provide them with supplies that will help them find success. Those paint brushes with stiff nylon bristles that come with children's paint are horrible and pretty impossible for accomplishing anything except stirring glue. Or you could use the end of the handle for creating dots. The buttons that my daughter used were from my stash of vintage buttons. But I gave her the ones I knew I would never use. Shop at garage sales or thrift stores or the bargain bins at craft stores. This doesn't have to be an expensive thing. Learn to recycle. For instance, those wavy cardboard bands that come on tea and coffee -- way cool paper! Cut it into shapes, paint, and glue away. You can get outdated books of wallpaper for free from your paintstore. When I teach children's classes we use Prang colored pencils. They are by far not the quality of Prismacolor. But they will blend a bit and cover pretty well. Most other children's colored pencils are more of a frustration to the budding artist.

Here is a picture of a collage created by one of my students. In this project as a class we first drew the elephants - freehand. Then the kids took various papers of their choice and created an environment for their elephant. They had the freedom to place their elephant anywhere they wanted - a jungle, sitting on their couch, eating at the table, playing in the swimming pool. My only rule for animal art is that they can not put them in a cage or on a chain. The artist that created this piece is 8 years old. I especially like her Weeping Willow tree.

Here are a few more ideas for you before I end this series.
*Let your kids make the card before they go to a birthday party.
*Or they could make a calender for grandparents. They can draw a picture for each month of the year and you can print them with the calender pages.
* They will really feel special if you take one of their drawings and use the special printer paper, make an iron on for their tshirt of their own art.
Please do not copy or download this student's art. It is her art and not mine to let you copy. Thank you for respecting that.

Monday, December 7, 2009

Teaching Children to be Creative, part 2


Today I'd like to talk about some projects you can do with children. I have some particular standards that I refuse to compromise on with kid's art.
1. I never do projects that look like they came out of a kid's crafts magazine. These projects are usually cheesy and require virtually no imagination.
2. I always do projects that allow and even require some imagination and creative choices by the child. If I take an example to class I tell the students that no one can make one just like mine. At the very least, change the colors.
3. I always try to use quality, although inexpensive, supplies. I think construction paper should be banned from the planet. It is awful to work with, it tears, it feels bad in your hands, and the color fades quickly. It doesn't cost that much to use a better quality paper.
4. Take the effort to do finishing touches, i.e. framing, matting, varnish, etc. You will be amazed at how much difference this will make. Take a child's piece of art, add a little varnish and suddenly it looks like folk art. Framing does the same thing and gives the piece significance in the child's (and your) eyes.
5. I only use non-toxic materials with children. No exceptions.
6. I only do the preparatory steps that are beyond the skill level of the child. Any other preparations or clean up, will be done by the kids. They need to learn the process and understand how to get "to" a project from the raw materials they have.

Project 1 Mosaic Flower Pot
I don't have a picture of this project. But its pretty simple and I'm sure you can imagine it. I came up with this idea when I wanted to do a mosaic piece with my students but couldn't find any instructions for a non-toxic adhesive.

supplies:
*1 clay pot (a younger child will want a smaller pot)
*white acrylic craft paint
*many colors of wrapping tissue paper - have it already cut into shapes about 1/2" - 3/4" in diameter. Its more interesting if they aren't all uniform shapes.
*varnish
*Modpodge, Royal Coat, or something equivalent
*sponge paint brush

1. Have the child paint the outside of the clay pot white. Let it dry. You can blow dry it if you are impatient like me. Then give it a second coat.
2. Show your little artist some pictures or real pieces of mosaic and encourage them to plan how they will create their design. They can work some of it out on the table. But kids don't usually have much patience for a whole lot of planning. They might want to make a recognizable image or they may want to just randomly place the colors on the pot. Let them choose. Don't push them to do what you want.
3. Show them how the mosaic examples have a space of grout in between the stones. Be careful not to call the example "real" verses their piece of "pretend". Just leave that part out.
4. Pour some of the Modpodge into a paper bowl and show the child how they can brush some lightly onto the pot. Then they take the tissue paper shapes and press them against the pot and dab the top with the sponge and a little Modpodge. Show them how leaving a space between their pieces of colored paper will help the white paint to look like the grout in their example.
5. When the pot is covered with papers and all the papers are covered with Modpodge, you will have to let this part air dry. No blow drying at this stage.
6. When totally dry, cover with at least one coat of varnish. The shine will make the tissue paper look more like tile pieces.
This pot can be used decoratively or for a creative container of treasures. But it is not meant to be used out in the weather or with real flowers that will need to be watered. It would make a wonderful holiday gift for a grandparent.

project 2 Christmas Tree Ornament (If you do not do Christmas trees, this project could be done with a different shape.)

supplies:
cardstock
various colors narrow craft ribbons (precut all of them to the same length - 1" longer than the widest part of your shape.
white glue
glitter

1. Cut out tree or other shape out of cardstock. If your child is old enough, let them cut it themselves.
2. Use old small paint brushes to dab glue onto the cardstock. Start at the bottom where the shape is the widest. Do not do the trunk yet.
3. Lay a stripe of ribbon across the tree and glue horizontally then repeat this process using a different color as you work your way up the tree.
4. About 2/3 way up the tree, turn the cardstock shape over and cut the excess ribbons on the sides so that it is flush with the sides of the shape. You will now have some short pieces of ribbon to be used on the narrow parts of the tree, i.e. the top and the trunk.
5. When the tree is covered, turn it over and finish cutting the excess edges.
6. Create ornaments and garland with the glue and sprinkle with glitter. Kids LOVE glitter!!! Don't cheat at this point and use that glitter glue that comes in tubes. It takes all the fun out of the whole sprinkling glitter part.
7. Take one of the longer ribbon pieces and glue it into a loop at the back for hanging.
**I've posted this tree image large so that you can download it and these instructions, if you wish.

The image at the top was done by my own daughter when she was 9. I would ask that do not download it.
Remember your main goal is to have fun, be creative, and think outside the box.
If you have any questions, write to me.
If you do any of these projects, send me a picture and I will post them on here in a post of collected pictures.

Sunday, December 6, 2009

Teaching Children to be Creative

One of the many hats that I wear is that of art teacher. I teach children as young as 5 and adults as high as they want to go. Studies have shown that studying art and experiencing creativity helps children to excel in every area of their lives. Over the years I've found that many parents think they can't do art with their children. They say, "Well I'm just not very creative." or "Why, I can't even draw a straight line." Well, I've got news for you. Drawing a straight line has nothing to do with it. Its more about freedom and fun than anything else. And kids are the easiest because they already feel creative freedom and already know how to have fun. You're just along for the ride!

Let's talk first about some barriers parents put up that stifle their kids creatively. A common complaint from my students is that their parents won't let them do anything messy. One can rarely be creative without being messy. So get a couple of vinyl table cloths. Throw one on the kitchen table and one on the floor and loosen up. Or better yet, when the weather allows, work outside. Come on parents, loosen up. Those kids are washable.

Another complication that parents often put on their children artistically is to expect the results to look like something straight out of a gift shop. They are kids. Their focus isn't that of an adult. Their fine motor skills aren't that of an adult. And their perspective isn't the same as an adult. So, let them be kids. Let them be artists. And see what wonderful creations they come up with.

WHATEVER YOU DO, DON'T FIX THEIR WORK. It won't be perfect. Thats ok. What you want to communicate to them is that it is fun to make art and what they make is delightful. Don't critique every line they draw or every color they choose. It is ok to make a few small corrections if they are said with a positive attitude and prefaced with a positive comment.. Something like this, "I love the bright colors you are choosing. Perhaps this line should be a bit shorter."

Display their work. You, as their parents, are the single most important factor influencing their sense of creativity for years to come. Of course, there is the classic home gallery, the refrigerator. Also they will love turning their rooms into their own personal art gallery. Let your kids use their art as gifts for grandparents, teachers, or even friends. Just think how affirming it is to them to believe that their artistic work is valuable enough to be a gift. Take a few of your favorite pieces and frame them. Yes, even hang them in your livingroom.

In the next week I will talk with you more about how to help your kids grow up to be creative people. Also I will give you some tutorials for inexpensive projects you can do with them.

I've included some examples done by some of my students ages 6, 11, and 12 respectively.


Related Posts Plugin for WordPress, Blogger...